//The following code should work out the box. If the joystick doesn’t register,
//try tuning the sensitivity settings below
//Included libraries
#include <Wire.h>
#include <LiquidCrystal_I2C.h>
#include <Servo.h>
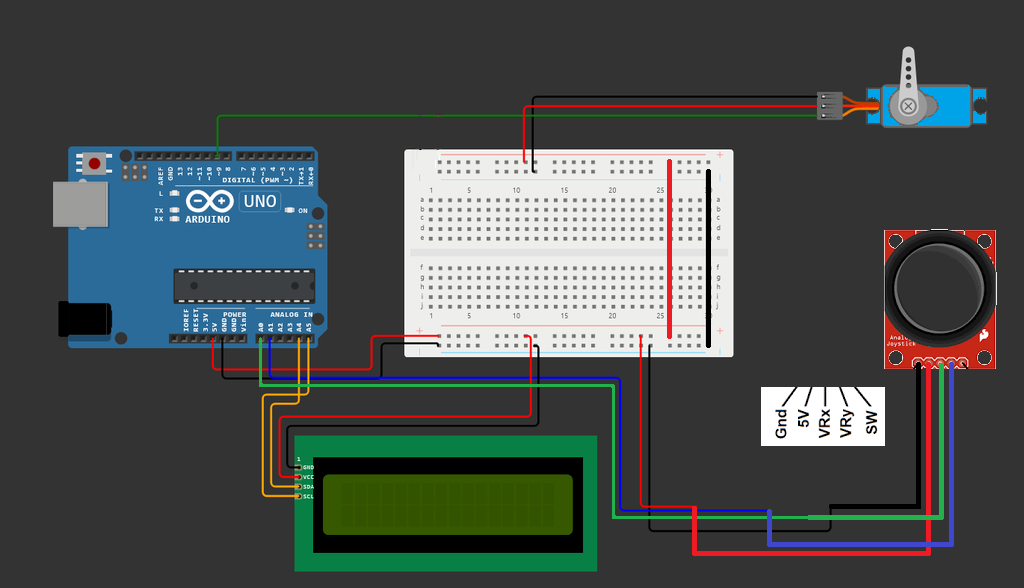
#define VRX_PIN A0 // Arduino pin connected to Joystick VRX pin
#define VRY_PIN A1 // Arduino pin connected to Joystick VRY pin
//Sensitivity for the Joystick
#define LEFT_THRESHOLD 400
#define RIGHT_THRESHOLD 800
#define UP_THRESHOLD 400
#define DOWN_THRESHOLD 800
//Joystick command setup
#define COMMAND_NO 0x00
#define COMMAND_LEFT 0x01
#define COMMAND_RIGHT 0x02
#define COMMAND_UP 0x04
#define COMMAND_DOWN 0x08
int xValue = 0; // To store value of the X axis
int yValue = 0; // To store value of the Y axis
int command = COMMAND_NO;
//LCD setup
LiquidCrystal_I2C lcd(0x27, 16, 2);
const int LCD_COLS = 16;
const int LCD_ROWS = 2;
int currentRow = 1;
int currentCollumn = 0;
//booleans that are true when text is being printed on the LCD
bool upperTextIsPrinting = true;
bool lowerTextIsPrinting = false;
//Servo setup
Servo servo;
int servoPos = 0; //servo position in degrees
//Variables that store the password and user input
String currentPassword = “1234”;
String currentInput = “”;
int inputCount = 0;
//Enumerators for the 3 different states
enum state{
CLOSED,
OPEN,
SETNEWPASSWORD
};
int currentState = CLOSED;//Always starts closed
void setup()
{
int status;
Serial.begin(9600) ;
servo.attach(9);
servo.write(0);//0 degrees is closed
// Initialize the LCD display
lcd.init();
// Turn on the backlight
lcd.backlight();
}
void loop() {
xValue = analogRead(VRX_PIN);
yValue = analogRead(VRY_PIN);
command = COMMAND_NO;
//Reads the input from the joystick
if (xValue < LEFT_THRESHOLD)
command = command | COMMAND_LEFT;
else if (xValue > RIGHT_THRESHOLD)
command = command | COMMAND_RIGHT;
if (yValue < UP_THRESHOLD)
command = command | COMMAND_UP;
else if (yValue > DOWN_THRESHOLD)
command = command | COMMAND_DOWN;
if(currentState != OPEN) { //OPEN is the only state in which input isn’t read this way
//The following few if statements process the user input to the LCD screen.
//Every time an input is detected, it checks the direction of
//the joystick, adds the corresponding number on the bottom screen, and
//moves the cursor to the left. Then there is a short delay until the
//next input is read, because otherwise the input would be read incredibly
//fast, which is not what you want. They also add 1 to the integer ‘inputCount’,
//which gets used later when checking for the correct password.
if (command & COMMAND_LEFT) {
Serial.println(“COMMAND LEFT”);
ProcessInput(4);
delay(400);
}
if (command & COMMAND_RIGHT) {
Serial.println(“COMMAND RIGHT”);
ProcessInput(2);
delay(400);
}
if (command & COMMAND_UP) {
Serial.println(“COMMAND UP”);
ProcessInput(1);
delay(400);
}
if (command & COMMAND_DOWN) {
Serial.println(“COMMAND DOWN”);
ProcessInput(3);
delay(400);
}
}
//The switch case that handles the three different states. Case 0 is CLOSED,
//case 1 is OPEN and case 2 is SETNEWPASSWORD
switch(currentState) {
case 0:
if(servoPos =! 0) {
servoPos = 0;
}
if (upperTextIsPrinting) {
UpperText(“Input Password”);
currentCollumn = 0;
currentRow = 1;
ClearInput();
}
if (currentInput == currentPassword && inputCount == 4) {
upperTextIsPrinting = true;
lowerTextIsPrinting = true;
UpperText(“Correct!”);
ClearInput();
servo.write(180);
servoPos = 180;
currentState = OPEN;
}
if (inputCount == 4 && currentInput != currentPassword) {
ClearInput();
UpperText(“Incorrect!”);
LowerText(” “);
currentCollumn = 0;
currentRow = 1;
}
break;
case 1:
if(servoPos =! 180) {
servoPos = 180;
}//180 degrees opens the safe by moving the servo away from the lock
if(lowerTextIsPrinting && lowerTextIsPrinting) {
UpperText(“Correct!”);
LowerText(“Welcome”);
}
if (currentInput == “1”) {
upperTextIsPrinting = true;
servo.write(0);
servoPos = 0;
currentState = CLOSED;
}
if (currentInput == “2”) {
upperTextIsPrinting = true;
ClearInput();
lcd.clear();
currentState = SETNEWPASSWORD;
}
break;
case 2:
if (upperTextIsPrinting) {
UpperText(“New password?”);
currentCollumn = 0;
currentRow = 1;
ClearInput();
}
if (inputCount == 4) {
currentPassword = currentInput;
ClearInput();
upperTextIsPrinting = true;
lowerTextIsPrinting = true;
currentState = OPEN;
}
break;
}
lcd.setCursor(currentCollumn, currentRow);
}
//Function that processes the user input, as described on lines 97-103
void ProcessInput(int inputNumber) {
lcd.print(inputNumber);
currentInput += inputNumber;
currentCollumn += 1;
inputCount += 1;
}
//Function that prints text on the upper row of the LCD
void UpperText(String text) {
lcd.setCursor(0, 0);
lcd.clear();
lcd.print(text);
upperTextIsPrinting = false;
}
//Function that prints text on the lower row of the LCD
void LowerText(String text) {
lcd.setCursor(0, 1);
lcd.print(text);
lowerTextIsPrinting = false;
}
//Function that clears the password that the user put in
void ClearInput() {
currentInput = “”;
inputCount = 0;
}
 أسلاك وتوصيلات, البطاريات وملحقاتها, جميع المنتجات