#include <Keypad.h> //Libraries you can download them via Arduino IDE
#include <Wire.h>
#include <LCD.h>
#include <LiquidCrystal_I2C.h>
#define I2C_ADDR 0x27 // LCD i2c Adress and pins
#define BACKLIGHT_PIN 3
#define En_pin 2
#define Rw_pin 1
#define Rs_pin 0
#define D4_pin 4
#define D5_pin 5
#define D6_pin 6
#define D7_pin 7
LiquidCrystal_I2C lcd(I2C_ADDR,En_pin,Rw_pin,Rs_pin,D4_pin,D5_pin,D6_pin,D7_pin);
const byte numRows= 4; //number of rows on the keypad
const byte numCols= 4; //number of columns on the keypad
int code = 1366;  //The code I used, you can change it
int tot,i1,i2,i3,i4;
char c1,c2,c3,c4;
//keymap defines the key pressed according to the row and columns just as appears on the keypad
char keymap[numRows][numCols]=
{
{'1', '2', '3', 'A'},
{'4', '5', '6', 'B'},
{'7', '8', '9', 'C'},
{'*', '0', '#', 'D'}
};
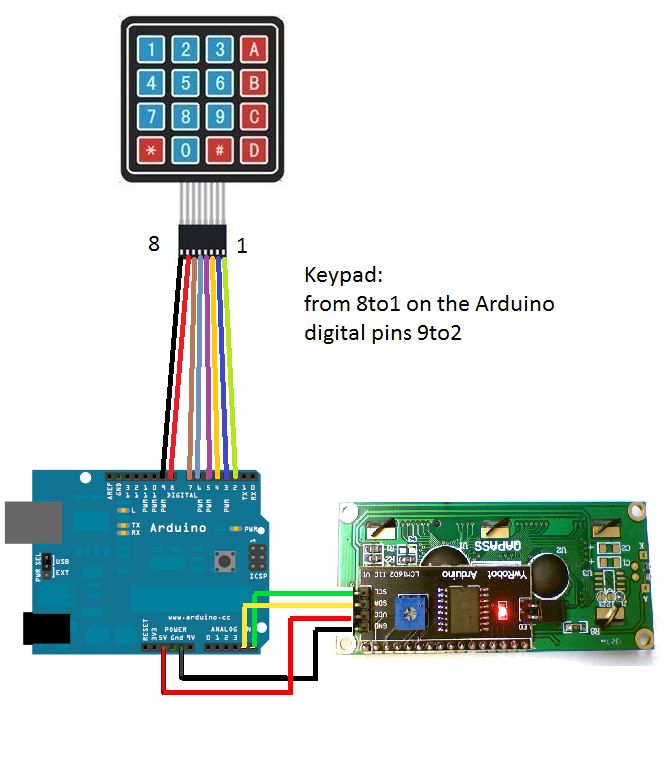
//Code that shows the the keypad connections to the arduino terminals
byte rowPins[numRows] = {9,8,7,6}; //Rows 0 to 3
byte colPins[numCols]= {5,4,3,2}; //Columns 0 to 3
//initializes an instance of the Keypad class
Keypad myKeypad= Keypad(makeKeymap(keymap), rowPins, colPins, numRows, numCols);
void setup()
           {
            lcd.begin (16,2);
            lcd.setBacklightPin(BACKLIGHT_PIN,POSITIVE);
            lcd.setBacklight(HIGH);
            lcd.home ();
            lcd.print("SurtrTech");
            lcd.setCursor(9, 1);
            lcd.print("Standby");
            delay(2000);
           }
void loop()
{
      char keypressed = myKeypad.getKey();  //The getKey fucntion keeps the program runing, as long you didn't press "*" the whole thing bellow wouldn't be triggered
         if (keypressed == '*')             // and you can use the rest of you're code simply
             {
               lcd.clear();
               lcd.setCursor(0, 0);
               lcd.print("Enter Code");                  //when the "*" key is pressed you can enter the passcode
                    keypressed = myKeypad.waitForKey();  // here all programs are stopped until you enter the four digits then it gets compared to the code above
                    if (keypressed != NO_KEY)
                      {
                       c1 = keypressed;
                       lcd.setCursor(0, 1);
                       lcd.print("*");
                       }
                    keypressed = myKeypad.waitForKey();
                    if (keypressed != NO_KEY)
                      {
                       c2 = keypressed;
                       lcd.setCursor(1, 1);
                       lcd.print("*");
                       }
                     keypressed = myKeypad.waitForKey();
                   if (keypressed != NO_KEY)
                      {
                       c3 = keypressed;
                       lcd.setCursor(2, 1);
                       lcd.print("*");
                       }
                      keypressed = myKeypad.waitForKey();
                   if (keypressed != NO_KEY)
                      {
                       c4 = keypressed;
                       lcd.setCursor(3, 1);
                       lcd.print("*");
                       }
                    i1=(c1-48)*1000;        //the keys pressed are stored into chars I convert them to int then i did some multiplication to get the code as an int of xxxx
                     i2=(c2-48)*100;
                     i3=(c3-48)*10;
                     i4=c4-48;

         tot=i1+i2+i3+i4;


         if (tot == code) //if the code is correct you trigger whatever you want here it just print a message on the screen
         {
          lcd.clear();
          lcd.setCursor(0, 0);
          lcd.print("Welcome");
          lcd.setCursor(7, 1);
          lcd.print("SurtrTech");
          delay(3000);
          lcd.clear();
          lcd.print("SurtrTech");
          lcd.setCursor(9, 1);
          lcd.print("Standby");

         }
         else //if the code is wrong you get another thing
         {
          lcd.clear();
          lcd.setCursor(0, 0);
          lcd.print("GTFO LOL");
          delay(3000);
          lcd.clear();
          lcd.print("SurtrTech");
          lcd.setCursor(9, 1);
          lcd.print("Standby");

         }

              }
}


